Of late, our wee mini gaming group within the larger club have been playing a series of WAB games all of which were over 5000pts a side, usually two or three players a side. Players have been able to dip in and out as they are available taking one side only. We have been running these large games (Middle Imperial Roman, Early and Thematic Byzantines El Cid and Moors etc) for a while now and it seems to be a format we have settled on for WAB games. The larger format (points) and number of players largely manage to reduce the competitiveness that can sometimes sneak in with the WAB rules (they were written by GW after all!). This has proven to be huge boon as it reduced the ghastly over combativeness which can be aroused in some players using these rules.
Originally we were playing on a 10' x 6' table but decided to mark out the edge of the table six inches in and allow for deployment of up to 12" of the centre line of the table so's to allow for more aggressive tactics to be employed. For this we used Hidden Deployment rules as described in the rulebook. (If anyone wants to know more, please leave a comment below and I can answer any questions). Looking back at the games we could have done with reducing the width/depth of the tables to 4 fee; as the weeks have gone by it appears more and more obvious the rules were not designed for tables this deep. all a bit of a crying shame as these are the main Ancient rules used at the club.
We had previously played the El Cid lists (North African Moors/Medieval Spanish Christian) from WAB Armies of Antiquity V.2 but I found the Christian Spanish list very limited because the number of miniatures we had at our disposal for infantry didn't match the Moorish army at all leading to a huge infantry disparity so, bearing in mind I was overly endowed with Heavy Cavalry I decided to go for a hard hitting mostly if not reliable First Crusade list predominantly cavalry army. (Incidentally, most of our heaviest hitting cavalry and Abbysiya horse archers took very little part on the game leaving the right flank to fend for itself!)
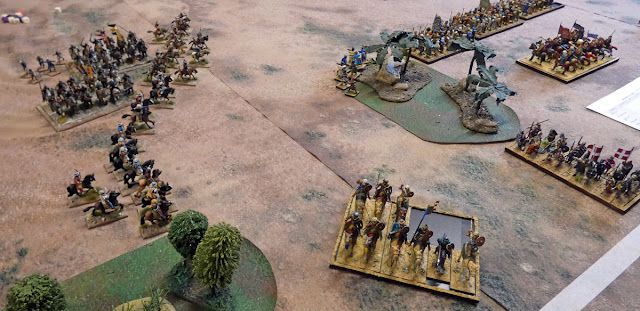
The sides deployed as in the Hidden Deployment rules in the WAB V.2 rulebook. The Moors had the best of the luck when rolling for terrain with a nice square-ish defensive position that was very hard to attack or flank. Nevertheless, both sides made the best of the deployment around what terrain was most favourable.
The Crusader Left Flank:
The Moorish Right Flank:
The cream of the Crusader army, all the character four in all (less the army general and army standard bearer needed to keep the flimsy infantry in check), plus the cream of the (First Charge/autobreak) Knights, the protective screen of Abbysiya Horse Archers and the extra unit of Naffatun (capable of making a unit panic if it takes one casualty- no armour save) move forward but do little damage with their shooting.
Another view of the Crusader Right flank as the opposing Knightly Allies sided with the Moors move forward at the far end of the table. The Moorish infantry also advance failing to cause any casualties to missile fire due to moving.
Another view as the Moorish army; this time Camel Riders take casualties. At this point the Abbysiya Horse Archers had proven to be quite disappointing in that they caused very little damage.
A view from the Crusader Right flank; the Crusader Knights and Moorish Allied Knights face off. (The Crusader praying they would not fail a Warband test!)
Another view of the battlefield and the Crusader Left Flank. (And a box!) The Abbysiya Horse Archers are held in place by a unit of Infantry, a unit of Camel Riders and some hopeless skirmishers in the wood. Again, their shooting was disappointing.
A serious volley of missile fire from the Crusader Crossbowmen, the Crusader Combined Formation units of spear and bow take a dent pout of one of the Moorish infantry units. What I have failed to mention, due to forgetting to take photo's, is the utter devastation of the Crusader Crossbowmen who were a temporary holding unit for the Crusader middle in the hope that the Crusader Heavies ands Abbysiya would come to the rescue.
Naffatum wielding nutters advance, take shots at the Cavalry but fail to do any damage. This was the last turn they would take part in the game.
Embarrassed Naffatun wielding nutters just before the Moorish Knights charges and they fled!
At this point things began to get interesting on the Crusader Right flank as a failed warband test resulted in the Crusader Knights surge forward forcing the other unit of Knights to follow suit and move up to support.
Another view of then inaction of the Crusader right flank. (I know not why the Naffatun loonies are hiding behind the knights with a nice juicy wood they could be hiding in causing mischief to their flank.
A battle won and the game lost! Crusader Knights charged the Moorish Allied Knights, did very little damage and lost the combat to First charge (auto broken). The other Crusader Knightly charge broke the other unit of Moorish Allied Knights (again, First charge and auto broken). Panic ensued all around. Literally everyone within 12" of the four units of Knights shared by both sides. Auto broken troops to one side, the Moorish troops were largely saved by their Ld 10 general (more than 90% chance of passing) and the Crusader let down by a lower leadership of 9.
It was on this flank that the game was won as i/ rescue with the cream of the Crusader army was nowhere in sight and ii/ the Crusader infantry were left floating on the tabletop and a large unit of Moorish Allied Knights about to wheel into their rear and finish them.
Still, the cream of the Crusader army take pot shots at units which matter not and do nothing to rescue the Crusader Right flank. Most unlike the player who usually plays a very tight game (I was beginning to think my fellow Crusading compatriot was a Moorish plant!)
More of the same.
The Moorish infantry advance into a commanding position in the centre of the battlefield.
Yep, if you hadn't noticed my frustration by now! LOL
Congratulations to the Moorish army who fought cleverly and valiantly. I'm not sure I can say the same for the Crusader army. "We" wer lacklustre in the extreme LOL
And a game of Impetus, run by Conrad Cairns (in as far as I know)


