English Men at Arms: Step by Step I:
Having not managed to make a post in over a week and finding myself painting a few men at arms I decided to do a quick step by step of how I have painted the more generic men at arms/knights. These will go towards making up the final base for Bedford's battle

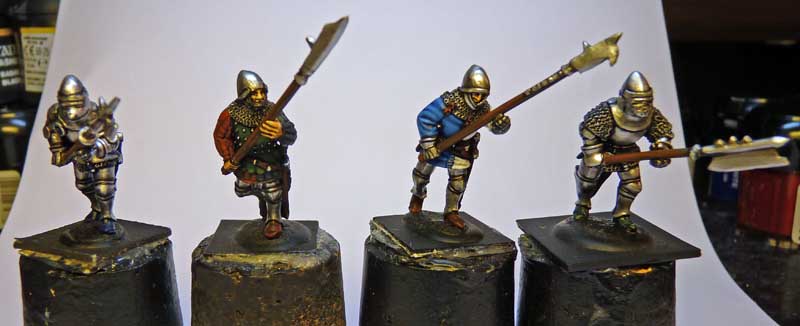
As you can see above we have four Perry Miniatures knights in the early stages of painting. Basically what we have before us is the figures cleaned up, given a dusting of black spray undercoat. This is then followed up with a 50/50 coat of Vallejo Matt Black and water. Into this I mix a small amount of Matt Acrylic Medium to give an excellent flat surface which nicely elucidates the detail on the miniature.
The next stage is to drybrush the mail and add a wash to the flesh. Any 'medium' flesh colour will do for a base- you will no doubt have your own preference. The flesh is given a couple of washes of Citadel Devlan Mud ready for highlighting later on. As for the drybrushing the mail, I start with a darkened mix of GW's Boltgun Metal (90% boltgun/10% Valejo Black) then progress to GW Chainmail then GW Mithril Silver. over the years I have found that the GW metallics are about the best in terms of quality. On the 'lesser men at arms' I then add a diluted wash of Citadel Badab Black over the mail. This helps indicate their status as the riguers of campaign and the lack of a page to clean up their armour means that they are likely to look quite shabby next to their gentlemanly superiors
The layering over the armour is done in much the same way but instead of drybrushing the paint is applied carefully in layers. It is important to take a look at a few suits of full harness before applying these layers. I have a collection of photo's that I've taken at various exhibitions and re-enactments but there is plenty available on the internet if you are stuck. Oddly enough the thing to do to get the impression of light bouncing off the surfaces of the armours is not to attempt to copy it direct from the pics. Instead try to create a general impression of what you see on your source material. This in my opinion gives the best results.
It is essential that the undercoat/earlier preperation is left showing through the different pieces of the plate. If you make a mistake, don't fret, you can easily rectify this by blacklining or in the case of the figures we are painting, just add some Vallejo Black to some Boltgun Metal and use this to line mistakes.
OK, that's it for now. Next I'll be adding the flesh tones and colour to the clothing and fabric covered armours.
English Men at Arms: Step by Step II:
OK, here's the pic of the men at arms with the armour fully painted. In the time since my last post the PO delivered the Andrea 'Silver' metal set to my door. I have used the lightest colour in their set to add an intermediate hue to the fully harnessed knights. With the 'lesser' man at arms I just stopped at the Andrea highlight and dropped the Mithril Silver- I think that it has had the desired effect in that they are hopefully looking slightly less bling! Note that I have also made a point of going over any areas between the plates where my brush may have strayed, this gives greater definition to the armour and neatens everything up to boot.

Next up will be the painting of the gambeson, the coat of plates and everything else. Should be done in a day or so.
English Men at Arms: Step by Step III:

As you can see they are now complete. Final colour selection was not too difficult for the men at arms as they are in full harness and it was really only a matter of choosing what colours to do their respective belts, shoes and scabbards etc. I chose a very dark blue and a very dark green (both from Foundry)- applying the paint in three layers paying attention to follow the contours of their equipment.
That out of the way, this being Bedfords main battle, I decided to keep with the theme of liveried retainers so one was chosen as one of Fastolf's men and the other was to wear the livery of Bedford and the Lancastrian kings.
Fastolf's livery is red and black. I used the Vallejo Dark Rust for the red from one of their Panzer Ace sets and added Vallejo Scarlet to highlight. Having just been delivered of the Black Andreas paint set it seemed the perfect moment to try it out of Falstolf's man. His gambeson was painted Vallejo Black and then highlighted with No's 5 and then 6 from the Andreas Black set. I think that it came out very well and is a very subtle way of highlighting black.
Bedford's man. I started with Foundry Midnight Blue(B) and added progressive layers of Foundry Sky Blue (A) then Vallejo white to the mix. The White being done with the Foundry Arctic Grey set but instead of using their white I use Vallejo Model Colour White as it is both strong and vibrant, all the better for painting up Late Medieval armies.
The leather work was GW Scorched Earth with Black, then Scorched Earth by itself and finally Dark Flesh. Polearms were Scorched Earth with a little Black and a highlight of a medium brown- any will do as long as it's not too light.
No comments:
Post a Comment
Please Feel Free to Leave a Comment