Saturday 28 November 2020

Varnishing Dark Age Period Miniatures- Gloss and Matt- My Way.

Hi,

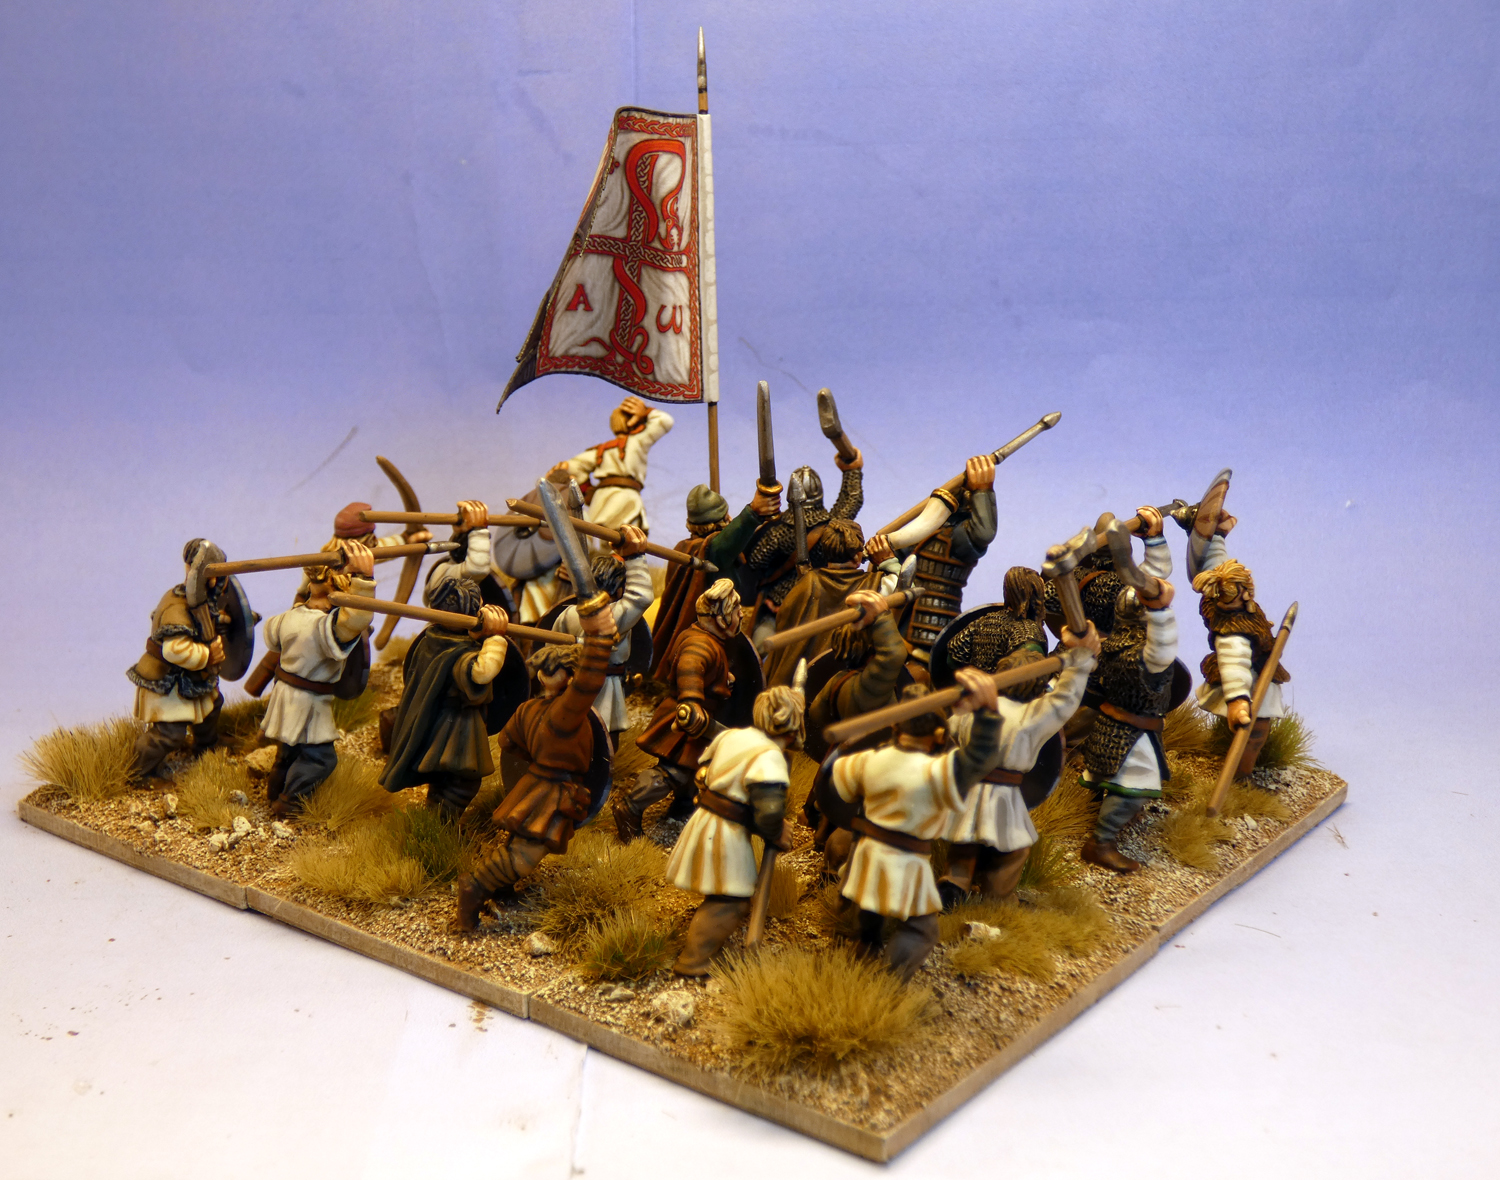
The finished article.... read on for more info.....


Although this has been titles "Varnishing Dark Age Period Miniatures" the same methods would be suitable for any period really. This is a simply a brief run through of how I personally prefer to varnish my miniatures. I realise that everyone will rightly have their own way of doing things, not only that, different individuals will get different results from using the exactly the same processes! 

This is simply the way in which I go about it and hopefully some of the information be useful for some of you? If not, then maybe of interest? I am a bit of a geek when it comes to painting; it is not unknown for me to have had conversations lasting several hours in person or even over the phone discussing painting! And yes, I do need to get out more, which unfortunately for me, is not really possible at the mo'.

Before I start, all the images in this article are "clickable" to help illustrate what I am referring to.

Also, before I go any further, I really ought to add, before spraying any varnish (or undercoat) on any miniatures I find that heating up the tin by placing it on a thick towel on top of a radiator for 20 minutes is very helpful in exciting the molecular structure of the medium. I also shake for 5 minutes, which is well in excess the one or two minutes recommended by most manufacturers. The point is somewhat obvious, you want the spray to be as well mixed as is possible. If you live in a cold climate or have cold winters, try setting up a spray booth in your house. A decent cardboard box and a couple of light sources are all you need. Just make sure the ventilation is good and that any children are out of harms way.

Glossing: 

So, the first thing I do is to get a medium bristle synthetic brush and give the miniatures a good dusting off . A brush not so soft as to leave dust in the recesses of the miniature but not so hard that it will take any of your paintwork off (this is something I do prior each painting session too). It's amazing how much dust can gather, even overnight and this can ruin the varnishing process even before you begin.

I use one of two options for glossing. My number one choice is brush on Humbrol DIY Enamel Gloss paint from a tin. This is super strong stuff when it has gone off. I bought several tins in bulk many years ago and still have a few left. Apply with an old synthetic brush and a small amount of thinners/white spirit making certain that you do not allow the varnish to pool or 'bubble'. Be sure to use an old reasonably stiff brush which can be cleaned with thinners/white spirit after the job is done. Oh, if you ever plan on using the brush again, clean it in white spirit after applying the varnish!

My second option for Gloss is to use Humbrol Enamel Gloss spray. This comes small in 150ml cans and it is just as more or less good as the brush on, certainly a lot more convenient but one has to be very careful not to let the varnish pool. If you do get any pooling I have found that a lint free cloth can be carefully used to 'pull' and excess away.


The Glossed Miniatures:


Then, wait about a week! Yes, seriously! Let the gloss go fully off prior to applying the matt varnish. This is actually something I learned recently from the maestro painter Redzedz. A few moths ago, I started to notice some spotting/icing appearing on some models, made enquiries on the net and discovered that although the gloss may seem to be dry, it in fact had not in fact fully gone off. A period of about a week is best to play it safe.

Matting:

For my matt layers I use Windsor and Newton Professional Matt Varnish. I used to use the old recipe of Testors Dullcote lacquer (in the black cans) but I have found that the newer version (in the white cans) nearly always leaves a satin sheen so stopped using it immediately. There is nothing wrong with using Testors if that is the sort of finish you are looking for. It is just not for me. 


As the matt varnish does not magically turn gloss the moment it lands on the model I usually find that I have missed a spot or two on the models. If you look closely at some of the miniatures in the images below you will notice that there are spots on the miniatures where there is some gloss showing through. Though typically, on the miniatures I matted down for this little article there is not a lot! I usually find that I have missed more! I always add an extra layer of matt, so two sprays a day or two apart. I always give the matt at least 24 hours between sprays to let it go off.


So, just to recap. You are essentially going from the very shiny miniature on the right to the matted down version after just one spray of the Windsor and Newton Artists Professional Matt varnish. 

The final layer of gloss has been applied. These are up and coming on a certain blog near you as soon as the LBMS transfers can be taken out of the packaging from the quarantine pile. I think you will agree that, in the images below, the miniatures are about as matt as they are going to get.


It would be remiss of me not to add that I have also heard very good things about MIG's Ultra Matt Lucky Varnish which I intend to buy just as soon as I can get to the local model shop who stock a wide range of MIG products. 

I do hope that this wee article might be of some help, or at least some interest to you if you have read this far?  If not, my apologies :>)

Friday 27 November 2020

Anglo Danish Casualty Markers

Another "bits and bobs" post with stuff painted and glossed from last week finished with a coat of Windsor and Newton matt varnish yesterday. It seems to have been a week of bits and pieces on the painting table and varnishing front. I've started cleaning up another unit of Aventine Miniatures Dismounted Bucellarri/Extra Heavy Infantry with more or less the same miniatures in one unit that I have already completed which can be seen HERE. I have added miniatures from the recently released packs which contain come clever conversions (beautifully sculpted by Adam of Aventine, not me!) to add a just a nice bit of variation.

I've been cleaning up some Gripping Beast Anglo Danes and Late Saxons. I think I am going to just after priming and undercoating (same with the Early Byzantines) as I'm taking part in the famous The Analogue Hobbies Painting Challenge starting on December 21st and it would be nice to have a few more units undercoated in advance. I've got three such units already prepared. For those who have not heard, The Analogue Painting Challenge is a yearly just for fun event starting on December 21st when one can start painting through too March. I've got a unit of Anglo Danish Huscarls and a few bits and bobs to go with them to keep me busy while I await the December 21st starting time! I can always add a few more prior the challenge starting proper if I get thus unit finished, which is very likely.

Onto the Anglo Danes!

This time we have Disorder/Disheartened/Cohesion (or lack of)/Disorder markers for use in most of the rulesets I will be playing once things are back to normal and we can all happily roll some dice together once more. Though I tend to multi-base, a decent amount of WAB is still played at our club and these will do nicely to mark off the casualties rather then remove individual bases. The markers have been a long time in the making as they have generally been hovering around on my desk for a while, a little painting here and a little there. Sometimes that can happen with smaller pieces. Perhaps I should think about doing them in batches- food for thought.

The markers were 'designed' with the following rules in mind. Swordpoint, Hail Caesar, To the Strongest, Dux Bellorum, WAB and a host of others.

There is not all that much I can add by way of words. I am confident that all the readers my blog will be very familiar with the concept of casualty markers! 

Marker 1 for First Unit:

I'm quite pleased with how the two markers have come out. The miniature is from Perry Miniatures Crusades range from their Casualty pack. The axe a spare from my bits box. I think it conveys nicely the idea of a Huscarl felled whilst attempting to strike another blow with his Daneaxe. 


Marker 2 for Second Unit:

Another fellow warrior felled, this time with a blow mighty enough to remove his helmet, drop his spear and shield. 


First Unit & Marker:


Second Unit and Marker (with Shieldwall Marker chucked in):


Thursday 26 November 2020

Frankish Command Base 1

I've been working on some bits and bobs of late. A few command bases for my Anglo Danish and Frankish army. The Little Big Man Transfers (from the mighty Steve- a very good chap) are still in my "quarantine" pile but I had some old transfers left over from years ago that would suite the now Catholic Franks (there's a hint of things to come in there somewhere ;>) ). 

The miniatures are both from Gripping Beast's Early Saxon ranges with an added Angon resting on the "Big Boss's" shoulder, again from Gripping Beast. Obviously these miniatures are not Franks as such but are eminently usable as such as they come from the same time era and more of less the same geographical location. 

If there was one alteration I would make it would be to cut the limbs down on the crossbar of the standard but as it is all painted, glossed and now varnished, that is simply not going to happen lol

From More or Less Side On:


Slightly Raised View:


The Command With the Unit:
Although the command stands will mostly be either resting at the back on the unit or hovering nearby, to my eyes it just does not seem right and is preferable to have a picture of a command base with the commander standing proudly by or to the front of the unit as opposed to cowering at the back. 


Saturday 21 November 2020

Shieldwall Markers Experiment

Not the most original of ideas but rather than using shields embedded in a base as markers (see picture below) to indicate that a particular unit is in Shieldwall I thought I'd try out a few of Gripping Beasts Anglo Saxon Shieldwall miniatures that I have had kicking around for probably two decades or thereabouts. 

The trick to getting them to look right was going to the be the base size so I ordered some 40m, 50mm and 60mm diameter custom bases from Warbases which arrived in a matter of days. Kudos to Warbases as some achievement with the inherent chaos within the postal system under our present 2020 circumstances.

After painting up three mini's I tried them on first the 40mm (way too small!), then the 50mm (still too small!) and lastly the 60mm base (perfect).

Shieldwall Marker on 60mm Diameter Base:


From Above:

So, next to take a look at what the marker looks like to the fore of a unit. I think they have come out as well as I had expected and will be painting up one for each unit. Yeah, it will take more time to paint these up but if you imagine seven units each with one of these markers for the fore of the unit, I think it might actually look quite striking. It will certainly have a more aesthetic appeal then a few shields glued to a base. 

First, the Old Markers I used to Use:


New and Improved Markers:

I love the happy accidents that sometimes occur when basing up miniatures. Although it is not all that dinstinct in the first two photographs, I am really pleased with the way in which the Dane Axe of one of the Huscarls hewing over the Shieldwall marker in the last image. A nice coincidence :>)


Tuesday 17 November 2020

Anglo Danish Huscarls and Fyrd Unit 2

The second unit in my Anglo Danish army now complete. There was quite a bit of painful rebasing (that dumb superglue idea I has when originally basing reared it's ugly head again!) but mercifully I was able to fill in a few gaps by painting four or five extra miniatures which of course needed varnishing. There is usually quite a long delay from applying my first coat of gloss to the final matting down of the miniatures; this I will go into more detail in a post very soon as I feel that it is an important step often overlooked if using enamel gloss varnish prior to matt.

Over all I'm pleased with the way the unit has come out. Despite the vignette base with the downed Huscarl with his comrade protecting his body being a bit sparse, I think the unit has maintained the Shieldwall presence so essential to getting an Andlo Danish army to look right on the table top. The miniatures are crammed in on 40mm x 40mm bases which nowadays can be tricky, especially if you want the unit to keep a cohesive fighting stance and not just appear as a load of Early Medieval/Dark Ages mini's all standing upright holding their spears! Which is not what my idea of such an army would have appeared at all., so crammed in they stand!

The picture below shows the two units I have now completed (a third is on the way now) and gives aa nice approximation of what they will look like when lined up next to one another. If you would like to take a closer look the image is "clickable" like all the images on my blog:


A picture taken from just above eye level of the unit in Shieldwall:


The rest of the pictures give a good 360 representation of the unit......


Monday 16 November 2020

Frankish Franks!


Those Early Byzantine have to fight someone so I decided to get some units of Franks painted up with a cursory eye in the direction of Casilinum/Volturnus 554 CE in mind.

Although these smaller Foundry Perry sculpts are smaller then your average 28mm miniature today and could have suited a 40mm x 40mm base, I made the decision to mount them on 40mm frontage by 60mm deep bases. The reasoning it twofold. First, the sculpts are very animated with a real sense of forward momentum and I wanted to conserve this feeling on the bases. The deeper bases allowed for a little more spacing. I hope that this displays my intention. The second reason is quite a simple; as they will be fighting my Early Byzantines I thought I would just stick to the same basing convention. Having said that, in the future if I need to stretch the basing convention for a particular unit, I will probably do so.

Here are a few snaps of the unit from various angles.

Please scroll further down the page to the pictures of the individual bases if you're interested.


Individual Bases:

Base 1:


Base 2:


Base 3:


Base 4:


Base 5:


Base 6: